Monday, May 9, 2011

Production Pipeline: Tiki-Totem Update

I have been making a lot of progress on the Tiki-totem. With the original totem concept art, the team at Darkwind was having some uncertainty with the color they received from the artist. The totem was very dark and would prove very hard to see in a small, game environment. It was put upon me to recolor the totem to what a felt fit the game, and also would be easily visible and recognizable. I planned to combine the newer concept art with some of the earlier designs from the game, while keeping it clean and understandable.

My re-imagined version of the Tiki-Totem Concept art.
With the coloring aspect of the Totem, I ended up lightening a lot of areas while adding the stone texture from other parts of the Blocks game. Adding accents to the face and using colors from the Tiki-man helped greatly.

From here I proceeded to sculpt the model in mudbox. I kept the model in separate chunks and simply repeated them 4 times around. The normals were not as intense as the tiki-man's making the coloring very important. Again using the normals as a template, I colored the textures in photoshop.

The Tiki-Totem Textured and normaled.
The model came out well and the Darkwind team seems pleased. It will be shorter than the Tiki-Man in game, and will likely light up when the Block is delivered to the island. I'll be using the higher resolution texture and normal map when I get a chance create a glamor shot of the Tiki-man and his totem together on an island.

Saturday, April 30, 2011

Production Pipeline: Tiki-Totem

The Tiki-Totem has already been modeled. I will be bringing it into mudbox the same way I did the Tiki-man textures. I was originally hesitant to do this method and instead find a simpler method. However, I do plan to render these for my own reel at a high quality. If I plan to do this, I would much rather use the actual normal map over the color map I made for in game use. 


On a side note, I am excited to say that was able to see the tiki-man actually moving in the blocks mobile game. He starts the level with a big stretch and dances upon completion.

Shatter Project: Removing the Arm

For two weeks, I have been editing footage to remove the actors arm and remaking whatever would have been behind it. This has been a very tedious and difficult job. Last week I was easily able to completely mask out the arm, but naturally this left a large arm shaped gap in his body as it crosses over. This last week was the far more difficult part, rebuilding his body behind it. I tried a series of methods to find the most efficient and best looking manner of recreating the lost areas of footage only to have all of them fail until I went back to the basics. Using morphing tools and motion paths in After Effects, I couldn't get a fluid and realistic looking transition as his cloth and fringe moved. The most efficient and best looking method turned out to be recreating the body frame by frame using Photoshop and its animation tools. Using the information from framed before and after the arm passes over a section of the body, I could recreate what needed to be there. I had to make some assumptions of the flow of his clothing by carefully studying the footage.

 Here is the original video captured running at 24 fps.

The same video after I edit out the arm.

Here you can see the result of this method. All in all I was able to do a decent job of removing his arm from the footage. Although there are some minor jitters, specifically toward the end with the yellow fringe, these areas should smooth themselves out when the video is run through the Optical Flow effect to slow the footage down.

Tuesday, April 26, 2011

Video Composite Masking

Now that my primary function as a modeler for the group, it is my job to help other area that need it. One of the jobs that I have been working on the last 2 weeks has been masking and cleaning video. The first scene I have been working with is the scene where the man's arm shatters. This is an extremely hard scene to try to mask because what I have to do is remove the mans arm from every frame and then rebuild/repaint anything that would be behind his arm including the other mans hand, his chest, clothing, belt, left hand, legs, floor and make sure that these frames are not only clean but also work as a fluid animation. This process is still not complete as I have removes his arm, and rebuilt his hand, the other mans hand, the floor and a few other pieces that were needed, however the remake of his body has proven quite a challenge with the movement of his clothing. Next post should have images of the completes composite.

The second scene that I have had to clean for the final video is the initial establishing shot. I had to remove the lights above the actors heads and also remove the track from the floor that the camera dolly rode on.


I remade the floor as closely as I could in Photoshop. From there, I used that image and placed it over the shot in After Effects. Initially it was quite a challenge to attempt to match the cameras forward motion, but using AE's motion tracking and simply tracking the tips of the camera's rails, I was able to get a motion that matched the original footage well.

The Tiki-Totem

It has been a while since my last post. I have been extremely busy with work and simply haven't had a chance to post on here. Since last time, I have been working a lot for these two projects and a very fun camera tracking project for my Tangible media class that I may also end up posting on here.

As for my work with Darkwind, I have the next model that they will be needing, a Totem pole that will be on the island with the Tiki-man. I have the initial concept that they have decided on, and will be receiving a color rendition soon.


As with the Tiki-man this model will be extremely low poly. I may follow the same technique I used with the Tiki-man, but I predict something like this being far easier to model with few polygons in comparison.

Tuesday, April 19, 2011

Shatter Project: Body Collision

Now that the base models have been completed, I have been working on setting up a collision mask for one of the bodies. To create the shatter effect we are using dynamics applied to a pre-shattered model, and when these pieces break off, they will also generate particles. When the particles go flying, we want them to collide with the body for a more realistic effect. To do this, a simple body was rigged and skinned and it was then my job to animate the body to match movement of the actor.


The silhouette this time did not need to be perfect, but at least follow the movement of the body decently. I personally am not too worried about the precision of the collision given that with direction of the impact and gravity effect applied, its unlikely particles will collide with the body, and the few that do collide will not be noticeable due to the amount of action in the shot. Regardless, I matched the body to the best of my abilities. From here on, I will be working on composting, removing the arm from the footage in After Effects.

Monday, April 18, 2011

Tiki-Man Color Texture


Above is a screen shot of the Tiki-man with his color texture applied. Using the normals' red and green channels, I generated a gray-scale texture for the Tiki-man. This gray-scale texture became a template for coloring him. The gray-scale texture was also used to create the illusion of depth within the diffuse texture. Using photoshop, I was able to use the template I had created to paint in the colors where they were needed. I attempted to remain as close to the original concept art as possible.

Wednesday, April 13, 2011

Digital Studio: The Body

There has been a ton of progress on the body model over the last week. I initially modeled the Body from the orthographic images that I gathered when the team was filming. The body did not have to be a perfect human replica because, given that it only needs to work under the same circumstances as the arm, it just has to silhouette the actor's body from the final footage.

Body model of actor made from orthographic references
One of the primary issues that I faced making the body was keeping it simple so the poly count was reasonable for the shatter effect without generating too may particles to calculate. Another issue that I have never encountered before on a more realistic proportioned human was the extremely baggy and lose uniform. The cloths made the model hard visualize proportionately and also harder to pose. Once the model was complete, I UV mapped him, created a simple skeletal rig, and positioned him to silhouette the film.

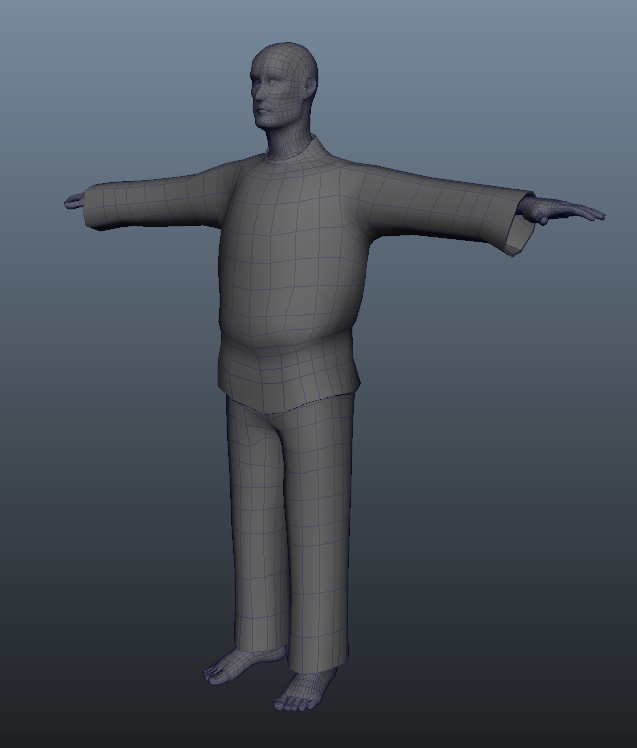
Wireframe of the model in position showing the silhouette process.
Positioning the model I faced a number of additional challenges. One of my major concerns was that the model needed to be positioned to match the shot shown above and an additional long shot. Because they are the same shot but done twice and at slightly changed times, the torso and legs do not properly line up, and because we do not have a scene that contains both cameras in the correct position and moving the right ways due to time constraints, it was much harder for me to get them to match. The second major concern i had was the focal length of each shot. The close up shot (shown above) is shot at 20mm focal length, and the long-shot in which the legs are matched is shot at 50mm. I was told to model and align the images in the front prospective which is unaffected by perspective and worry that when the shots transition from the closer shot to the longer shot that things may appear distorted. I was assured that this would be alright, and also agree believing that things at this point in time will be moving far too fast for anyone to notice such a slight change in the model.

Test render of texturing and rendering process.
Above is a test render I made for myself. The image is of the positioned and silhouetted body model with a screen of the actual film applied in a planar map down the front access. This test shows that the model matches the actual body reasonably well with only a few minor adjustments needed around the hands. The texture only works from this angle however, if the camera rotates around the model the texture fails.

-E.Doody

Saturday, April 9, 2011

Digital Studio: Shatter Project - Silhouetting the Arm

Because we have not heard back from the Dreamwork's mentor, the "Dreamworks Project" shall, for now, be referred to as the Shatter Project. These past weeks I have been working on a few separate sections of my part in the project. First, I have been working on the Body model for the actor that needs to shatter completely. That model will most likely be posted here next post over the next few days. Secondly, I UVed the arm model that I had created a few weeks before so that it can be easily textured in the next part of the project.


I UVed the hand open before I closed it for its final position to make it much easier and avoid any overlapping UVs. The final part that I have been working on is silhouetting the arm model to match the arm of the actor in the actual footage.

Here is a shot of the wireframe model over the actual arm. Using this, the texturing team will project the film over the arm simplifying the texturing process.

Saturday, April 2, 2011

Production Pipeline: Tiki-Man Normaled

It has been a long week of texturing, sculpting, and normal mapping. I have completed the Tiki-man normals. The normal maps transferred better than I had even hoped. Also, I finished the staff that he will be holding. I have sent the files to Darkwind Media where they will rig and animate the model. The original plan of having them rig him and then me animate has changed. Because they need more assets for the game in a relatively tight time span, I will instead be finishing the colored Tiki-man textures and completing a number of other models for the game. Here is an image of the model with normals applied next to the exact same normal with a flat shaded wireframe.


On the left you can see the model with normal map and transparency map applied, the right side image is the actual geometry of the model. Normal maps are a fantastic way to add detail and and give depth to a much simpler model. From here I need to take the normal map and generate an actual colored texture for him.

Above you can see the combined normals which will give you a good sense of the UV layout on the model. The model was kept to a single UV map to optimize the process required to load the model and textures in a real time game engine.

Until next time,
-Doody

Monday, March 28, 2011

Production Pipeline: Texturing Workflow

Last week I was able to unwrap the Tiki-man model's UVs. Once the UVs were laid out to the best of my ability, I decided that I would generate normal maps using Autodesk's Mudbox. In Mudbox I created an extremely high poly version of the model and was able to sculpt in the details that I want seen on the simple version.

High-poly model within Mudbox.

One I had finished the detailed version of the mask, I attempted to export the normal map from the high poly model for the low poly version. Time and time again, Mudbox is unable to correctly export a good quality and clean normal map for me. As I often am forced to do, I had to bring the high poly mesh into Maya and pray that the program doesn't crash. With the model in Maya, I used Maya's texturing tools to calculate a normal map. And here is the result.

The Low-poly model with the normal map applied

I was able to generate a relatively clean normal map within Maya. The normal map needs some cleaning in Photoshop but this process should save me a great deal of time when texturing. With normals, I am able to get the detail I would like to see in a high poly model using only 160 or so polygons. This normal texture will also serve as a map for when I create the diffuse texture for the model. Although the Engine the game will be played in is unable to support normal maps, I will attempt to bake the shadows of the normal map to give a greater depth to the simple model. With the mask done, I will be using the same kind of technique for the remainder of the body.

Wednesday, March 23, 2011

Production Pipeline: Tiki-Man Model

I have just about finished the Tiki-man model. He is currently 760 polygons and can be cut down some more if needed. I plan to unwrap his UVs and begin texturing as soon as I can.

Tuesday, March 22, 2011

Digital Studio: Reference Images 2

Because my work for the arm model is currently as far along as it can be, I will be getting a head start on the second model needed. The model will be a full body that will eventually match the silhouette of the body within the film. The body will then be passed off to the programmers and texture artists who will be making the body shatter properly.


The images were taken last Friday at the filming. The film team we are working with did an excellent job preparing lighting, stage, and camera movements. The shots are looking great and are being edited together into a finalized form of the film without any special effects or additional editing. Once the editing is done my job will be to get back to the arm model to make it match with the arm in the film.

Production Pipeline: Progress

I have been gradually working on the Tiki-man model for the Blocks mobile game. One of the major struggles I have faced when working on the model is keeping to the extremely low poly-count. Because the game is being made for cell phones and other mobile devices in the unity engine, the character model must use as little polygons as possible. Working on the face, a major part of the model I initially was going to indent the mouth and eyes where they need to be. By removing the mouth and eyes and instead planning to use textures to color them and create the illusion of depth, I was able to significantly reduce the poly-count.

New reduced model compared to original plan.

This is the first time I have had to model with such strict poly limits. Hopefully I am able to keep the remainder of the Tiki-mans body simple enough to work for the game but still look good. I think using the textures for mouth and eyes will help optimize the model and also look better removing jagged edges.

Wednesday, March 16, 2011

Digital Studio: Progress

I had a lot of time to work today on the arm and hand model for the project. Using the images that I had gathered last weekend, I was able to construct a hand that matched the hand of the actor reasonably well. I planned to model the hand first and then use some basic rigging and a little weight painting to make the hand close into the first.


I am leaving the wrist and arm separate for now and will combine them once I have the final pose of the arm from the film. Once I had the arm and hand modeled to match the images as best I could, I began to rig the hand to close into a fist.


Once the hand was clenched, I painted joint weights to make the fingers look as accurate as possible. From there I deleted the history, separating the hand from the joints, and used the "Sculpt Geometry Tool" to fix any stretching from using the joints as well as fill in the closed fist to get a better realistic feeling of the soft tissues in the hand and fingers.


Here is the resulting model. The hand and arm look good enough for this point in time and may need to be changed later to match the models hand in the film.

-Doody

"Dreamworks" : Photoshoot

Last Friday the team from the project met with the martial artists that we will be working with for the project. The meeting was set up for two reasons, first to collect reference images of the actors arms and bodies that need to be modeled and secondly to work out the choreography of the fight. My job here as the modeler was to collect any initial reference images that I would need to work this week constructing the arm model. I took images of the hand open and closed in case the fingers would need to be completely present within the closed fist for when the arm shatters.


Here are a few of the images I took. They are not perfect but will serve the purpose they need for the beginning model. I will be collecting more images this upcoming week at the actual filming. The images collected there will be used to fine tune the model to perfectly silhouette the arm in the film.

After seeing the actors in action I am excited to see how the project will turn out.
-Doody

Monday, March 14, 2011

Tiki-man

Drawing By Daniel Farruggia

Production Pipeline: Reference Images

Drawing By Daniel Farruggia
Here are the Orthographic images of the "Tiki-man" provided by Darkwind Media. I will need to fix these images slightly to make sure that all parts of his body are properly proportioned. I hope to start modeling him soon.

Thursday, March 10, 2011

Digital Studio: "Dreamworks Project"

For the open Digital Studio, I will be working on the project dubbed the "Dreamworks Project." This project is thus named because a Dreamworks associate will be mentoring the group. The goal of the project is to create a short film that combines live action shots with 3D special effects. The scene that is being rendered will be that of two martial artists fighting. Upon one heavy blow, the defenders arm will begin to crack. With another strike, his arm shatters. This Project incorporates several departments combining film, 3D, programming, and choreography.

My main job within the group will be as a modeler and UVer. Tomorrow night, the group will meet with the actors before the taping where it is my job to gather orthographic images of the actors arm that will be shattered. I will take reference images of the actors arms with fingers out, and in a closed fist. I will also take additional images of the actors arm in a position that is as close as possible to the actual position the arm will be in when it shatters. These images will help me model the arm and also provide possible textures.

Once my job as modeler is complete I will continue to work with the team. My focus, once all modeling is final, will be assisting Anthony Castaneda with creating realistic appearing particle shatter effect. I am very excited about seeing where this project goes and how it will turn out.

-Doody

Project Pipeline

For this project, I have offered to create assets for a game called Blocks: The Devilish Delivery Game. The Game is currently available on XBox Live under the Independent Game section and the development team now intends to port the game to mobile devices. The game will retain its 3D graphics and style and gameplay but in a simplified form with a lower poly-count. The studio, Darkwind Media, plans to implement a simple character to add more appeal to the already addictive game.

I was approached by Darkwind to create this character for them along with many other small assets to add to the aesthetics of the world they are creating. The character known as the "Tiki-man" has already been designed and placed into orthographic images for me to work from in Maya. I will be constructing a low-poly and high-poly version of the assets for both in game and rendering purposes. A full list of assets and images will be posted here soon.

The character will be simple, but will need to be rigged and weighted for animation. The current plan is to have him dance around when the player delivers the block to the island. I hope to create a small animation of this dance for this class. Additionally, I will be rendering a turntable with wireframe for most of the assets I create.

Until Next time,

-Doody

Wednesday, March 9, 2011

First Post

This is the first post of many. This blog will primarily be following my 3DDG work through the 2011 Spring quarter at RIT for two of my classes, Project Pipeline and Digital Studio. Through this blog I will show my work's progression, share problems that I face, and (in the end) show a completed project for each of these of these major courses over the next 10 weeks. These classes grant us the freedom to chose our own projects to work on.